Baseball caps, trucker hats, and structured sport caps take a beating. Sweat, dirt, and grime settle into the fabric, leaving behind stains and odors that won’t quit. Hand-washing works, but it’s time-consuming and inconsistent. The dishwasher method offers a faster, more controlled alternative that many homeowners have relied on for decades. It uses hot water, detergent, and the dishwasher’s shape to clean and maintain the cap’s structure simultaneously. This guide walks through the process step-by-step, covering which hats are dishwasher-safe, how to prep and load them correctly, and how to avoid the mistakes that ruin caps.
Table of Contents
ToggleKey Takeaways
- Cleaning hats in the dishwasher works best for synthetic baseball caps and modern structured hats (post-1980s) because the top rack holds shape while hot water and enzymes break down sweat and oils effectively.
- Before loading, pre-treat sweat stains with a baking soda paste, pre-rinse loose dirt, and always inspect hats for cardboard bills and loose threads to avoid damage during the wash cycle.
- Never use the bottom rack, heated dry cycle, or wash hats with dirty dishes—place caps crown-down on the top rack only, use half-dose detergent, and skip bleach or scented formulas that fade colors.
- Vintage caps with cardboard bills, wool hats, leather trim, and delicate fabrics like silk or linen should never be cleaned in the dishwasher; hand-washing is safer for irreplaceable pieces.
- Air-dry cleaned hats on a hat form or round object away from direct sunlight for 12–24 hours, then shape the bill while damp and store in a cool, dry place to prevent mildew and maintain longevity.
Why the Dishwasher Method Works for Hat Cleaning
The dishwasher’s environment is surprisingly well-suited for cleaning structured hats. Unlike a washing machine’s agitation cycle, which can warp bills and crush crowns, the dishwasher holds the hat in place while spraying water from multiple angles. The top rack provides a stable platform, and the gentle spray action reaches into seams and sweatbands without mechanical stress.
Hot water breaks down oils and sweat buildup more effectively than cold hand-washing. Most dishwasher detergents contain enzymes designed to tackle protein-based stains, exactly what you’re dealing with in sweat-soaked headwear. The rinse cycle removes detergent residue that hand-rinsing often leaves behind.
The method also maintains the cap’s shape during cleaning. The dishwasher rack acts like a hat form, supporting the crown and bill while water does the work. This is a major advantage over machine washing, where hats tumble freely and emerge misshapen. For homeowners looking for simple cleaning strategies, the dishwasher method delivers consistent results with minimal effort.
One caveat: this method works best for synthetic fabrics and modern construction. Hats made after the 1980s typically use plastic-reinforced bills and colorfast dyes that tolerate dishwasher conditions. Vintage caps, wool hats, and those with cardboard bills will not survive the process.
Which Hats Are Safe to Clean in the Dishwasher?
Not every hat belongs in the dishwasher. Material composition, bill construction, and dye stability determine whether a cap will come out clean or ruined.
Safe for dishwasher cleaning:
• Cotton or polyester baseball caps with plastic-reinforced bills
• Trucker hats with mesh backs and foam fronts
• Sport caps made from moisture-wicking synthetic blends
• Structured hats with modern plastic or foam bills (post-1980s manufacturing)
Never put these in the dishwasher:
• Wool hats (fedoras, winter caps), they’ll shrink and felt
• Vintage caps with cardboard bills, the bill will disintegrate
• Hats with leather trim, patches, or bands, leather cracks and discolors
• Delicate fabrics like silk or linen
• Hats with non-colorfast dyes, test for colorfastness first
To check if a bill is cardboard or plastic, gently squeeze the bill’s edge. Cardboard feels stiffer and may show slight layering at the edge. Plastic bills are more flexible and uniform. When in doubt, assume older hats (pre-1990s) have cardboard construction.
For caps with embroidered logos or patches, inspect the stitching. Modern machine embroidery holds up well, but hand-stitched or glued embellishments may loosen in the dishwasher. If the cap has sentimental value or is vintage, skip the dishwasher and hand-wash instead. Approaches used in washing delicate items often recommend gentler methods for irreplaceable pieces.
Step-by-Step Guide to Washing Hats in Your Dishwasher
Preparing Your Hat for the Dishwasher
Prep work makes the difference between a clean hat and a disaster. Start by spot-treating heavy stains. Mix a paste of baking soda and water (3:1 ratio) and apply it to sweat stains on the sweatband and bill. Let it sit for 15 minutes. For grease or makeup stains, dab with a small amount of dish soap using a soft-bristle brush.
Pre-rinse the hat under lukewarm water to remove loose dirt and dust. This prevents grit from redepositing during the wash cycle. Check inside the sweatband for deodorant buildup or body oils, these areas need extra attention.
If washing multiple hats, inspect each one for loose threads, tears, or weak seams. The dishwasher’s spray can worsen existing damage. Trim any loose threads with scissors before loading.
Safety note: Remove any pins, buttons, or metal accessories that could rust or damage the dishwasher’s interior. Check for hidden staples in the sweatband, especially in promotional or event caps.
Loading and Running the Dishwasher Cycle
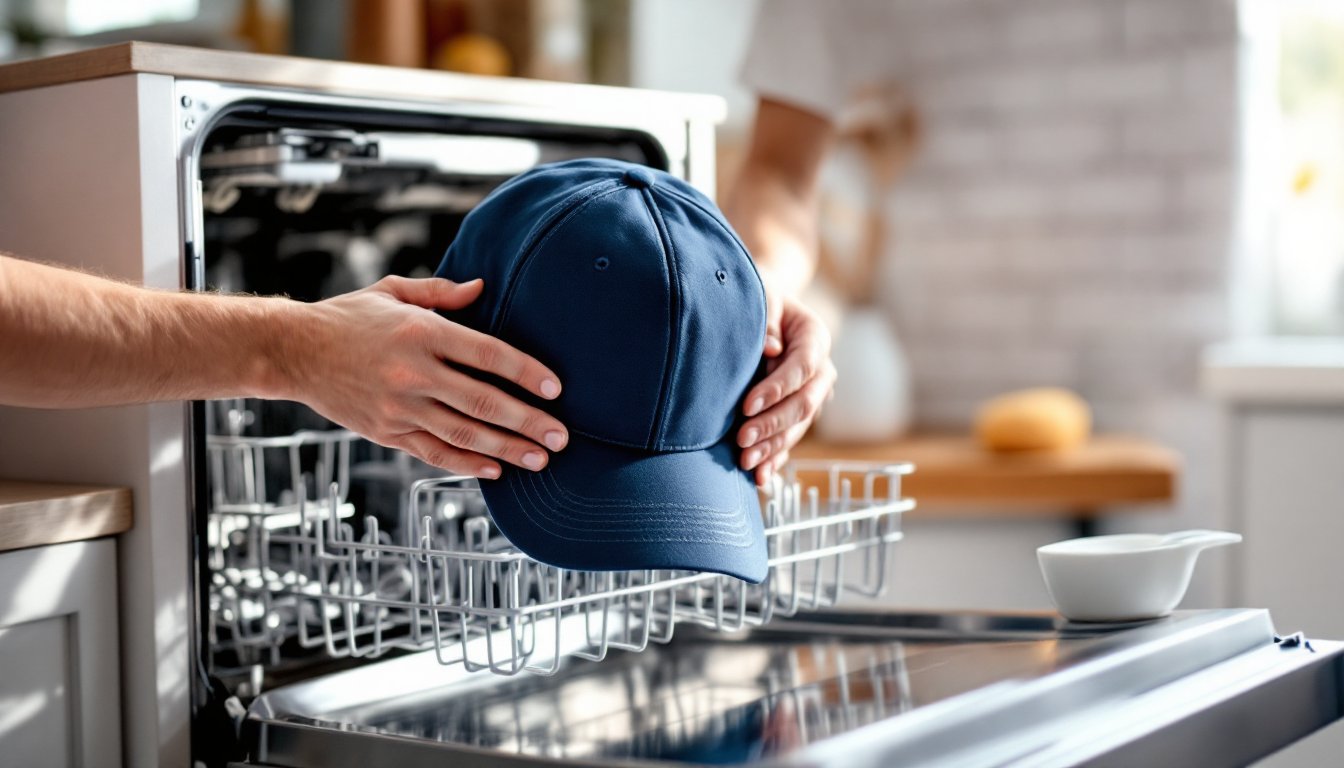
Place the hat on the top rack only, crown facing down. The prongs should support the hat’s interior, holding the crown’s shape while allowing water to reach all surfaces. If the hat slides around, secure it by positioning it between prong rows or using a dishwasher-safe hat form (sold at home improvement stores and online).
Do not load dishes with the hat. Food particles, grease, and strong food odors can transfer to the fabric. Run the hat separately or with other non-food items like dish brushes or sink caddies.
Use regular dishwasher detergent, about half the amount you’d use for a full dish load. Avoid detergents with bleach or lemon scent, which can fade colors or leave a strong smell. Skip the heated dry cycle: heat can warp plastic bills and shrink fabric.
Select a normal or light wash cycle with warm or cool water. Hot water (above 130°F) can cause dyes to bleed, especially in red, black, or navy caps. For organizational methods that apply to home tasks, home management advice often emphasizes similar attention to detail.
Run the cycle. Once finished, immediately remove the hat to prevent mildew from forming in the damp environment.
Common Mistakes to Avoid When Dishwasher Cleaning Hats
Even with the right materials, poor technique ruins hats. Here’s what goes wrong and how to avoid it.
Using the bottom rack. The bottom rack’s proximity to the heating element and stronger spray jets can warp bills and fade fabric. Always use the top rack, even if it means washing fewer hats at once.
Running the heated dry cycle. Heat is the enemy of hat integrity. It softens plastic bills, causing them to warp or droop. It also shrinks cotton and polyester blends. Always turn off the heated dry setting and air-dry instead.
Washing with dirty dishes. Food grease and odors transfer easily to porous fabric. Tomato sauce, curry, and fish smells are particularly stubborn. If you wouldn’t want your hat smelling like last night’s dinner, don’t wash them together.
Overloading the dishwasher. Cramming multiple hats onto one rack prevents water from reaching all surfaces. Sweatbands and inner seams stay dirty. Limit it to two or three hats maximum per cycle, spaced apart.
Ignoring colorfastness. Dark caps (black, navy, maroon) and bright colors (red, orange) are prone to bleeding. Test by dabbing a hidden spot with a wet white cloth. If color transfers, hand-wash separately or expect fading.
Skipping the pre-treatment. Dishwasher detergent lifts general grime, but it won’t eliminate set-in sweat stains or oil buildup without help. Pre-treating the sweatband with baking soda paste or dish soap significantly improves results.
Forgetting to check the bill type. This bears repeating: cardboard bills will dissolve. If you’re unsure, squeeze the bill’s edge. Cardboard feels layered and rigid: plastic is smooth and slightly flexible.
Drying Your Hat Properly After Washing
Drying determines whether the hat keeps its shape or ends up as a warped mess. Never use a clothes dryer or direct heat source (hair dryer, radiator, direct sunlight). Heat causes shrinkage and bill warping.
The best method: air-dry on a hat form or over a round object. A coffee canister, small mixing bowl, or balloon works. The form should be slightly smaller than the hat’s interior to avoid stretching. Place the hat crown-down over the form, smoothing the fabric and shaping the bill by hand.
Set the form in a well-ventilated area away from direct sunlight. A laundry room, covered porch, or spare bathroom with a fan works well. Sunlight fades colors, especially on dark caps.
Drying time: Expect 12 to 24 hours depending on humidity and fabric thickness. Mesh trucker hats dry faster than all-cotton caps. Check the sweatband, it’s the slowest part to dry and can develop mildew if you box up the hat too soon.
If you don’t have a hat form, stuff the crown lightly with a clean towel to maintain shape. Don’t overstuff: it stretches the fabric. Lay the hat on a clean towel, bill supported by a rolled washcloth to prevent flattening.
Pro tip: For caps with a curved bill, shape the curve while the hat is still slightly damp. Gently bend the bill to your preferred curve and secure it with a large rubber band or binder clip overnight. The fabric will hold the shape as it dries.
Once fully dry, inspect the sweatband for any remaining odor. If it still smells, sprinkle baking soda inside the crown, let it sit for a few hours, then shake it out. Store clean hats in a cool, dry place, never in plastic bags, which trap moisture and cause mildew.


