Patio pavers take a beating. Between rain, dirt, leaf debris, foot traffic, and spills from summer barbecues, they lose their color and texture over time. What once looked sharp and inviting can turn into a grimy, slippery mess dotted with weeds and moss. The good news? Most paver cleaning doesn’t require a professional crew or specialized equipment. With the right approach, a homeowner can restore that outdoor living space to near-new condition in a weekend. This guide walks through the tools, techniques, and maintenance strategies needed to clean patio pavers and keep them looking good year after year.
Table of Contents
ToggleKey Takeaways
- Regular cleaning patio pavers prevents slip hazards, staining, and expensive structural damage caused by moisture, algae, and moss growth.
- Effective patio paver cleaning requires only basic tools like a stiff-bristle broom, garden hose, and optional pressure washer—no professional crew needed.
- Different stains require targeted treatments: use oxygen bleach for organic growth, diluted vinegar for efflorescence, and commercial rust removers for metal stains.
- Polymeric sand is the best defense against weeds and moss in paver joints, as it hardens to lock pavers in place and block weed seeds.
- Sealing pavers every 2–5 years protects against stains, moisture, and UV fading while making future cleaning easier and maintaining your outdoor investment.
Why Regular Patio Paver Cleaning Matters
Pavers aren’t just decorative, they’re a functional surface that endures constant exposure to the elements. Over time, organic matter like algae, moss, and lichen takes hold in the joints and on the surface, especially in shaded or damp areas. This growth doesn’t just look bad: it creates a slip hazard and can gradually degrade the paver material itself.
Dirt and grime also trap moisture against the surface, which accelerates staining and can lead to efflorescence, that white, powdery residue caused by salt migration. In freeze-thaw climates, trapped moisture can cause pavers to crack or heave. Regular cleaning removes these threats before they become expensive repairs.
Beyond durability, clean pavers simply improve curb appeal and usability. A well-maintained patio extends living space and adds value to the property. Neglecting routine cleaning means dealing with tougher stains and more aggressive methods later, which can damage the pavers or the polymeric sand between them.
Essential Tools and Materials for Cleaning Patio Pavers
Start by gathering the right tools. Most paver cleaning jobs don’t require anything exotic, but having the correct equipment makes the work faster and more effective.
Tools:
- Stiff-bristle push broom (for sweeping and scrubbing)
- Garden hose with spray nozzle (adjustable pressure helps)
- Pressure washer (optional but highly effective: 1,500–3,000 PSI range)
- Bucket (for mixing cleaning solutions)
- Plastic scraper or putty knife (for weeds and embedded debris)
- Safety goggles and rubber gloves
- Knee pads (if scrubbing by hand)
Materials:
- Dish soap or paver cleaner (pH-neutral formulas work best)
- White vinegar (for light mildew and mineral deposits)
- Oxygen bleach or sodium percarbonate (for organic stains: safer than chlorine bleach)
- Muriatic acid (for rust or efflorescence: handle with extreme care)
- Polymeric sand (to refill joints after cleaning, if necessary)
If using a pressure washer, choose a 15- or 25-degree nozzle. A zero-degree tip can gouge pavers and blast out joint sand. For delicate or older pavers, stick with a garden hose and elbow grease, it’s slower but safer. Always wear safety goggles when pressure washing or working with chemical cleaners, and use rubber gloves when handling acids or strong detergents.
Step-by-Step Guide to Cleaning Patio Pavers
Cleaning pavers isn’t complicated, but following a methodical process prevents damage and ensures even results.
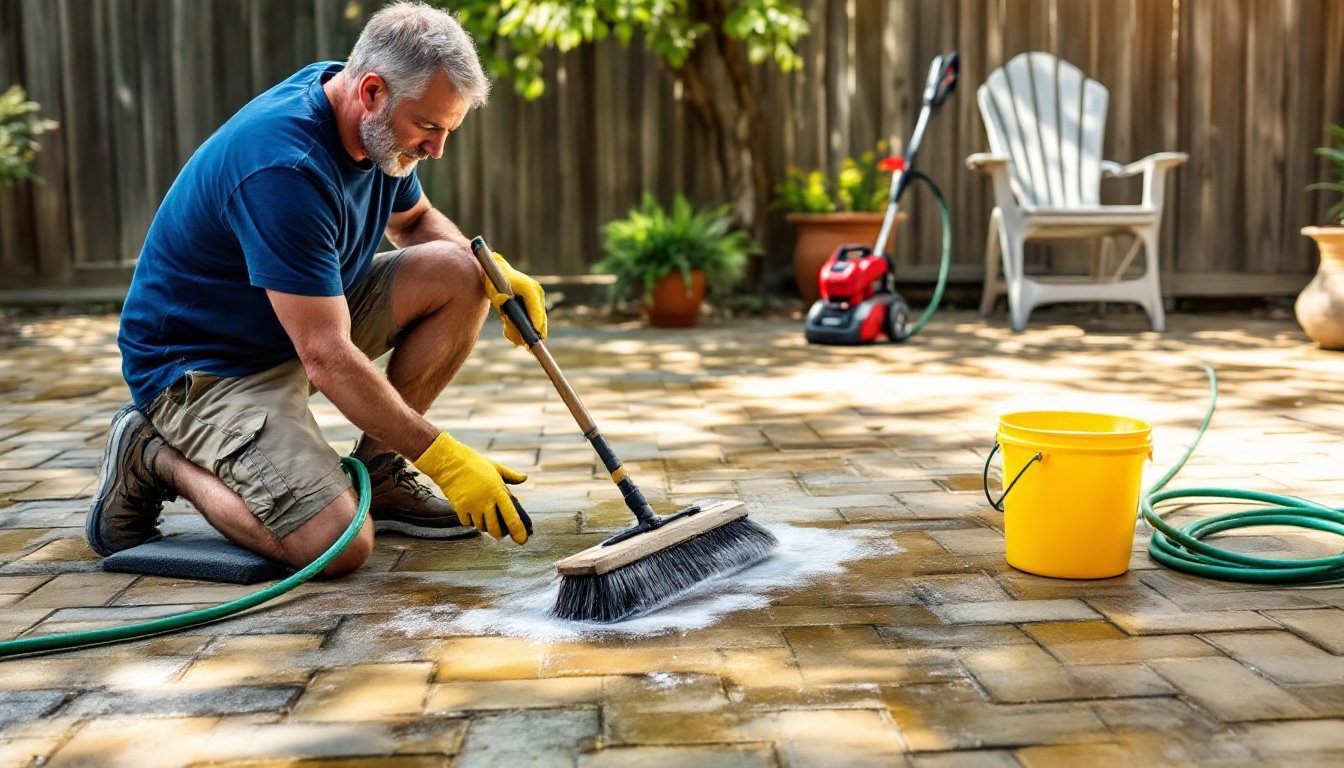
1. Clear the patio. Remove furniture, planters, grills, and any other items. Sweep the entire surface with a stiff-bristle broom to remove loose dirt, leaves, and debris. Pay attention to the joints, get as much material out as possible before wetting anything down.
2. Pre-rinse the pavers. Use a garden hose to wet the entire surface. This prevents cleaning solution from soaking too quickly into the pavers and helps loosen surface grime.
3. Apply cleaning solution. For general cleaning, mix a few tablespoons of dish soap or a dedicated paver cleaner in a bucket of warm water. Pour or spray the solution over the pavers, working in sections. For tougher buildup, consider an oxygen bleach solution, mix according to package directions and let it sit for 10–15 minutes.
4. Scrub the surface. Use the push broom to scrub in overlapping passes. Focus on stained or discolored areas. For stubborn spots, a smaller hand brush or even a deck brush works well. Don’t skip this step, mechanical scrubbing does most of the work.
5. Rinse thoroughly. Use a garden hose or pressure washer to rinse away all soap and debris. If using a pressure washer, hold the wand at a consistent distance (about 12–18 inches) and sweep in even strokes. Avoid lingering in one spot, which can etch the surface or dislodge joint sand.
6. Inspect and repeat if necessary. Once dry, check for any remaining stains or spots. Some issues, like oil, rust, or deep-set organics, require targeted treatments covered in the next section.
7. Let the pavers dry completely. This usually takes 24–48 hours depending on weather. Don’t replace furniture or apply sealant until the surface is bone-dry.
Removing Stubborn Stains from Patio Pavers
Not all stains respond to soap and water. Different contaminants require different approaches.
Oil and grease: Sprinkle cat litter or baking soda over fresh spills to absorb the oil. Let it sit for a few hours, then sweep up and scrub with dish soap and hot water. For set-in grease, use a degreaser formulated for concrete or masonry. Apply, scrub, and rinse.
Rust stains: These often come from metal furniture or fertilizer. Use a commercial rust remover designed for masonry, or carefully apply a diluted muriatic acid solution (10 parts water to 1 part acid, always add acid to water, never the reverse). Wear gloves, goggles, and work in a well-ventilated area. Apply with a brush, let sit for a few minutes, then rinse thoroughly.
Efflorescence: That white, chalky residue is salt leaching out of the pavers. It’s cosmetic, not structural. Sweep it off with a dry broom, or use a diluted vinegar solution (1 part vinegar to 5 parts water). Rinse well. If it keeps recurring, check for drainage issues, standing water accelerates efflorescence.
Organic stains (leaves, berries, algae): Use an oxygen bleach cleaner or a 50/50 mix of water and white vinegar. Let it sit for 15–20 minutes, scrub, and rinse. Many seasonal maintenance routines include treating organic buildup before it sets in permanently.
Mildew and mold: Similar to algae, these thrive in shaded, damp areas. Oxygen bleach or a vinegar solution works well. Avoid chlorine bleach on colored pavers, it can cause discoloration. Scrub with a stiff brush and rinse completely.
Preventing Moss and Weed Growth Between Pavers
Weeds and moss are the top complaint from paver owners. They sprout in the joints, push pavers apart, and look terrible. Prevention starts with proper joint fill and good drainage.
Polymeric sand is the best defense. Unlike regular sand, it contains a polymer binder that hardens when activated with water, locking pavers in place and preventing weed seeds from taking root. After cleaning, refill any eroded joints with fresh polymeric sand. Sweep it into the gaps, mist lightly with water, and let it cure according to the manufacturer’s instructions.
If weeds do appear, pull them by hand or use a plastic scraper to dislodge the roots. Avoid metal tools, which can scratch pavers. For persistent growth, spot-treat with a vinegar-based herbicide or a targeted weed killer safe for hardscaping. Do not use broad-spectrum herbicides near plant beds.
Moss thrives in shade and moisture. Improve drainage by ensuring pavers slope away from structures (a minimum 1/8-inch per foot grade). Trim back overhanging branches to increase sunlight. Proper hardscape installation emphasizes drainage and joint stability from the start, but these issues can be corrected after the fact with regrading or adding a French drain if necessary.
A post-cleaning application of a moss inhibitor can also help. These products typically contain zinc or copper compounds and are applied after the pavers dry. They won’t harm the pavers but discourage organic growth for months.
Sealing Patio Pavers for Long-Term Protection
Sealing isn’t mandatory, but it extends the life of pavers and makes future cleaning easier. A quality paver sealer creates a protective barrier against stains, moisture, UV fading, and weed growth. It also enhances color, giving pavers a subtle sheen or wet look depending on the product.
Before sealing, pavers must be completely clean and dry. Any trapped dirt, soap residue, or moisture will compromise adhesion and appearance. Wait at least 48 hours after cleaning, longer if humidity is high.
Choose between two main types of sealer:
Water-based sealers are easier to apply, low-odor, and environmentally friendly. They offer good protection without dramatically changing the appearance. They’re a solid choice for homeowners who want a natural look.
Solvent-based sealers provide stronger protection and a more pronounced color enhancement. They’re more durable but require better ventilation during application and longer cure times. Some formulas also darken the pavers noticeably.
Application is straightforward. Use a pump sprayer or paint roller to apply an even coat, working in sections and avoiding puddles. Most sealers require two coats, applied 2–4 hours apart. Keep foot traffic off the pavers for 24–48 hours, and avoid heavy use or furniture placement for up to a week.
Reapply sealer every 2–5 years, depending on traffic and weather exposure. Comprehensive maintenance guides often recommend resealing after any major cleaning or repairs to maintain consistent protection across the surface.
Conclusion
Cleaning patio pavers isn’t a one-time fix, it’s part of an ongoing maintenance cycle. With regular sweeping, timely stain treatment, and occasional deep cleaning, pavers stay functional and attractive for decades. Sealing and proper joint fill reduce future labor and protect the investment. The effort pays off in durability, safety, and curb appeal that makes outdoor spaces worth using.


